This was the invitation for my daughter's 3rd birthday party. She fell in love with "Pinkalicious" when we borrowed it from the library, and I ended up ordering a copy from Amazon for her so we wouldn't have to keep checking it out! At the time, I didn't have a die-cutting machine, so I hand-cut the design above out of scrapbook paper and cardstock, and embellished them with rhinestones, ric rac, and a sparkling "3" thicker (yes, it's actually called a thicker. I'm guessing...thick sticker?)
I created the poem as well, and let the guests know that we would all be having green food to cure our "Pinkatitis", and for each guest to wear pink or red...almost everyone did!
Pinkalicious Cupcake Invitations: http://www.etsy.com/listing/84103329/pinkalicious-pink-cupcake

Most of the decorations for the party consisted of tissue paper, tulle, and balloons...all relatively inexpensive, and because of this, I was able to buy a lot! I made a ton of tissue paper pom poms in different shades of pink, and hung them everywhere...the large ones were placed over the dessert buffet table and in the windows, and the smaller ones throughout the house. Tulle was a nice feminine alternative to traditional crepe paper, and were the same colors I used to make my daughter's tutu!
The book was displayed prominently over the fireplace, and was flanked by two ribbon topiaries...not bad for my first attempt at topiaries! A frame of pink roses was hung on the other side of fireplace, with a pink-hued picture of Emily displayed inside. Since most of the pom poms were hung by the lights or in the windows, the whole house looked pink, pink, pink!
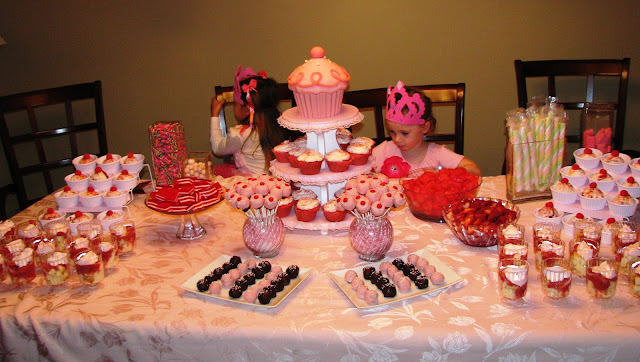
The picture of the table is the dessert table "before"...I found it very helpful to have all of the dishes, cups, and serving trays set up ahead of time. Once it was time for dessert, it was just a matter of matching up the right dessert to the right section. The cupcake pedestal was from Oriental Trading Company ($10), made of of REALLY sturdy styrofoam. I covered each circle with the same pink-striped paper that was used on the invitation (as well as other parts of the table), and then trimmed the sides with pink lace and pushpins...you would never know it was styrofoam!
As each guest arrived, the first thing they saw was a sign telling them to help themselves to a "pinktail"! I cut small pieces of "hair" from a pink wig, attached them to alligator clips, lined them with gross grain ribbon, and adorned each one of them with a pink acrylic gemstone...everyone wore them!
I found these water labels on-line as a FREE download...just print, cut, and tape! http://733blog.blogspot.com/2011/04/sugar-spice-55.html
These were for the adults...aren't they pretty? I found this awesome site: http://jelly-shot-test-kitchen.blogspot.com/, and fell in love with jelly shots! No actual Jello used, made of liquor, juice, and gelatin...they were gone in 10 minutes!
Once all of the guests arrived, Emily's aunt read "Pinkalicious" to the crowd. After some free play time and appetizers, it was time to eat!
The sign above the buffet says "The Cure for Pinkatitis: Green Food!" Dinner included sausage and green bell peppers, edamame salad, grilled chicken with parsley, rice and green peas, tossed salad greens, asparagus, broccoli, and a large sandwich (with some green garnish added on top so it would fit in!)
I always like having some sort of arts and crafts activity for the kids to do, and what usually happens is the adults end up making as many projects as the children! There were three Pinkalicious-related crafts...make your own wand, crown, and cupcake bank. Thank you Oriental Trading Company for always having the supplies I need!
We then played Pin the Cherry on the Cupcake, and then it was time for....DESSERT!!
Dessert included individual strawberry shortcake cups, pink and white layered jello (yes, regular jello this time!), cubed watermelon, sliced strawberries, oreo truffles dipped in semi-sweet and pink chocolate, individual strawberry ice cream sundaes, glass vases filled with pink candies, and of course...cake! I had cake in three different forms: I made tiny cupcake pops (my first attempt at pops!) by following this tutorial from Martha Stewart: http://www.marthastewart.com/315587/cupcake-pops-and-bites
The cupcakes were strawberry cake topped with strawberry whipped cream. The giant cupcake was made in the Wilton giant cupcake pan, and was strawberry cake as well. I found a great idea on how to make the cupcake liner on http://ohsugarcakes.blogspot.com/2009/03/pinkalicious-cupcake.html by filling the cake pan with melted chocolate, chilling, and adding a second layer. It slid right out of the mold, and then I baked the cake, trimmed the bottom, and it slid right into the chocolate mold! I covered the top with fondant, then added fondant sprinkles and a cherry.
I made Emily's tutu as well, and sell these hand-made tutus, dresses, and other accessories at http://www.etsy.com/shop/TwoTulipGirls?ref=ss_profile
Each guest left with a Pinkalicious gift box filled with little gifts to take home (wands, jewelry, stickers, purses, and note pads). The boxes were from Oriental Trading Company, and I added the picture of Pinkalicious and each child's name.
So, maybe I overdid it a tiny bit, but I think Emily and everyone else had a Pinktastic time!


